Meet Easton Nathanael Persaud

Nat and Lauren, some of my best friends, have a new member of the family as of February 7. Easton Nathanael is an adorable baby boy and I feel so lucky to have met him when he was just 8 hours old. Lauren and Nat had Mitzy and me over on Saturday to take some photos of the new family of 4. I haven’t had a lot of experience with baby photography but I love shooting their kids. Their daughter, Harper, has become quite the photogenic toddler especially now that she’s warmed up to me. Here is one of my favourites (D7000 with AF-S 35mm f/1.8 @ f/2.8 1/200s ISO 400):DSC_9809-Edit-2To give a bit of editing history, here is the image when first imported into Lightroom.DSC_9809-2In Lightroom I did a few tweaks to prepare the shot for editing in Photoshop, namely

  • highlight reduction/shadow boost
  • reduced clarity/increased sharpness
  • vibrance reduction
  • lens correction
  • ‘Camera Portrait’ camera calibration

This is how the photo looked coming out of Lightroom:DSC_9809In Photoshop I removed some dry skin and red patches (under the nose and the lines on the shoulder). I used the color correction tool to shift some of the magenta tones in the skin towards the green and some local reduction of red saturation. I tried out a new Photoshop preset (a gift from a friend) to get the final look.

Enjoy!

The Tragically Hip at the Aud – More Photos

This post is a follow-up to last week’s about my impromptu shoot at a Tragically Hip show at the Kitchener Auditorium. I thought I’d show a bunch more photos but also give a few tips and tricks.

Let’s start with packing gear. Because I hadn’t ever shot at an indoor stadium show and had no idea what kind of vantage point I’d have, I brought nearly everything (11-16, 17-55, 50-135, 35, 50, 85 and both the D300s and D7000… oh, and some strobes and light modifiers too). I really didn’t know if I would even have the chance to change lenses during the shoot but I wanted to be safe. At the time I also didn’t know the extent of the shoot…. would I be covering just the show? or maybe shooting the band afterwords? would the writer need some details to support an interview? In the end, when I found that I would just be shooting the first three songs, I opted for a simple and versatile setup that would need no lens swapping. I put the AF-S 17-55 f/2.8 on the D300s and the Tokina 50-135 f/2.8 on the D7000 and left the rest in the car.

Concert photography presents a few technical challenges due to the extreme contrast and colour of light and fast-moving performers. In the concerts I’m used to shooting, there is barely enough light to shoot 1/60s with a wide open lens at ISO 1600; however during this show there was ample light. I chose to shoot at ISO 1600 with the lenses wide open or near-wide open but was able to get very fast shutter speeds like 1/250s. Freezing the subjects was a breeze.

When shooting a concert the hall is usually quite dark and the subjects quite bright. Imagine trying to properly expose a backlit penguin in the snow and then invert the light and dark. The camera will want to expose for the shadows and completely blow out the subjects. When shooting wide angle with the D300s I dealt with this extreme contrast by setting the exposure compensation to -1EV and crossing my fingers. For the most part it worked and I got a lot of keepers. With the D7000 and 50-135 I used the spot meter instead of the matrix meter. I actually have the function button programmed to quickly switch to spot meter while pressed. Occasionally I would combine the spot meter with the AE-L (exposure lock) when I needed to recompose.

In all I got 20-25 shots that I consider keepers (not bad for three songs). Here is a selection.Tragically Hip - Feb 5 2013-18Tragically Hip - Feb 5 2013-2 Tragically Hip - Feb 5 2013-17 Tragically Hip - Feb 5 2013-16 Tragically Hip - Feb 5 2013-14 Tragically Hip - Feb 5 2013-13 Tragically Hip - Feb 5 2013-11 Tragically Hip - Feb 5 2013-10 Tragically Hip - Feb 5 2013-9 Tragically Hip - Feb 5 2013-7 Tragically Hip - Feb 5 2013-6 Tragically Hip - Feb 5 2013-5 Tragically Hip - Feb 5 2013-4 Tragically Hip - Feb 5 2013-3 Tragically Hip - Feb 5 2013-20 Tragically Hip - Feb 5 2013-21 Tragically Hip - Feb 5 2013-22

An Oldie but a Goodie

Here is a photo that I took a few years ago (June, 2008, to be specific) of my friend Elsa as part of a series of art for her upcoming album. Elsa wanted an “ethereal” feel and dressed accordingly. After taking a few in the garden and another few under a tree (with a lamb!) we saw that the sky was rapidly darkening. As the clouds rolled in and claps of thunder were heard in the distance I made the snap decision for us to hop over the fence an up into the field.2549214861_b348e08ffe_oWe had two lights with us, Vivitar 285HV, and cheapo ebay triggers for firing them. I set them up in a simple arrangement with the main light at camera right and the other at camera left to act as a rim. This second light can be seen at the left of the frame. I set the camera (K10D) to manual, 1/80s, f/6.3, ISO 160 to get the ambient exposure how I wanted it (1/2-1 stops underexposed) and adjusted the flashes to either 1/2 or full power. The lens, a Pentax DA 16-45/4 was zoomed out to 16mm.

A few quick snaps later and we were happy… and just in time, because as soon as we packed up the skies opened up and it rained like you wouldn’t believe!

Thoughts?

Lighting Candid Photos with Handheld Flash

When photographing candids in a dark environment, there are many options for lighting. One could choose to use the camera’s built-in flash, but that gives harsh shadows and terrible red eye. Adding a speedlight (flash) to the hotshoe and firing it directly moves the light source a bit off axis, but shadows are still harsh and red eye is still a risk. Diffusing the light, say with a Gary Fong Lightsphere or a Lumiquest Softbox (both of which mount directly to the head of the shoe-mounted flash), helps too. However, the light is still on axis.

A very common solution, and one which I often use, is to tilt the strobe head up and bounce it from a ceiling or wall. This effectively provides a large off-axis light source, giving a very soft fill. However, if the ceiling is quite high, non-white, or not there at all bouncing just won’t work. Even if bouncing does work, the fill is still quite soft and undramatic.

A lighting solution that I’ve been working with for the past while is to hold the flash in one hand while shooting with the other. I put a diffusion on the flash, usually a Lumiquest Softbox LTz and hold it with my left arm outstretched at about 30 degrees from horizontal. This method gives soft (but not too soft) off-axis light that is easily under my control.DSC_8341I trigger the flash (Nikon SB-900 or SB-700) using Nikon’s CLS (Creative Lighting System). I set the camera’s built-in flash as a “controller” so that it will control remote flashes but not add to the exposure. If I had set it to be a “master” it would fire as part of the exposure. I then set the handheld flash to be a remote, making sure that both it and the built-in flash are set to the same channel and group. (Note: Nikon CLS isn’t actually that complicated once you figure out all of the terminology. I found this site to be extremely useful.)

DSC_8347Of course, having more than one light source usually improves a photo even more. In the case of a wedding I did this fall in a barn, the light shining through the windows and poking through cracks in the wall provided an excellent backlight to complement the light from my flash.DSC_6378DSC_6429 DSC_6436 DSC_6427Thanks for reading!

The Making of a Scary Basement Photos – Part 2 (Editing)

I’d like to follow up my previous post with a more detailed explanation of how I pieced the composite image together and achieved the final look. Certain aspects of Photoshop, or photo editing in general, may seem like black art but in this case the process is fairly straightforward. I use two common image editing programs:

  • Adobe Photoshop Lightroom 4 (currently at v4.3)
  • Adobe Photoshop CS5

As I mentioned in the last post I started the process of taking this image with the final product in mind, simplifying the editing process considerably.

DSC_9718-Edit-5The first step, as in all my post-production, was to import the images into Lightroom. For those who don’t know, Lightroom is an extremely versatile program that provides a near-complete workflow from import, sort, edit, print, upload plus simple tools for generating slide shows, webpages and books. I do 95% of my editing in Lightroom and usually only go to Photoshop for complicated edits like cloning and healing or anything where layers are required.

ScreenHunter_02 Jan. 11 16.42With the image of the blue room I adjusted the levels to get the brightness/contrast I wanted. I tuned the blue colour of the room with a white balance adjustment and the hue/saturation/luminance controls. I also used this control to reduce the red and orange saturation on my face.ScreenHunter_03 Jan. 11 16.44If you recall from the previous post I took a second image of the blue room with the snooted flash removed. I copied all of the adjustments from above over to this image. With the red room, I made minimal adjustments. I tweaked the white balance and increased saturation. I added some blacks to increase contrast.ScreenHunter_04 Jan. 11 16.46When finished in Lightroom I opened the three images as layers in a single Photoshop file in the following order: empty blue room > blue room with me > red room. I selected the three layers and used the Auto-Align Layers tool (in Automatic mode) to remove any misalignment from slight camera movements between shots. ScreenHunter_06 Jan. 11 16.52I masked off the right side of the “blue me” layer (to allow the underlying empty room to come through). The first image below is the resulting layer and the second image is the mask used to create it.ScreenHunter_05 Jan. 11 16.51ScreenHunter_08 Jan. 11 16.52The red room required a more complex mask to keep the red on the door and floor but not spill onto the door frame on the right side.ScreenHunter_09 Jan. 11 16.53 ScreenHunter_10 Jan. 11 16.53The three layers, when all visible, appear like this:ScreenHunter_10 Jan. 11 16.54My next step was to remove blemishes such as the smoke alarm in the blue room and some messy cables. For this I created a new layer above the three image layers. I set the healing brush and clone stamp tools to sample from all layers below. The edits appeared in the new layer, leaving the underlying layers untouched. This method makes the removal of healing/cloning edits much simpler because they can be deleted from the self-contained layer. Here is the layer containing the edits.ScreenHunter_11 Jan. 11 16.54As a final adjustment I added a curves adjustment, again as a new layer but masked off the red room.ScreenHunter_11 Jan. 11 16.55Here is the final image in Photoshop:ScreenHunter_12 Jan. 11 16.56Finally, I opened the image up in Lightroom and cropped on a slight angle to add a bit of drama.DSC_9718-Edit-5Thanks for reading!

The Making of a Scary Basement Photo

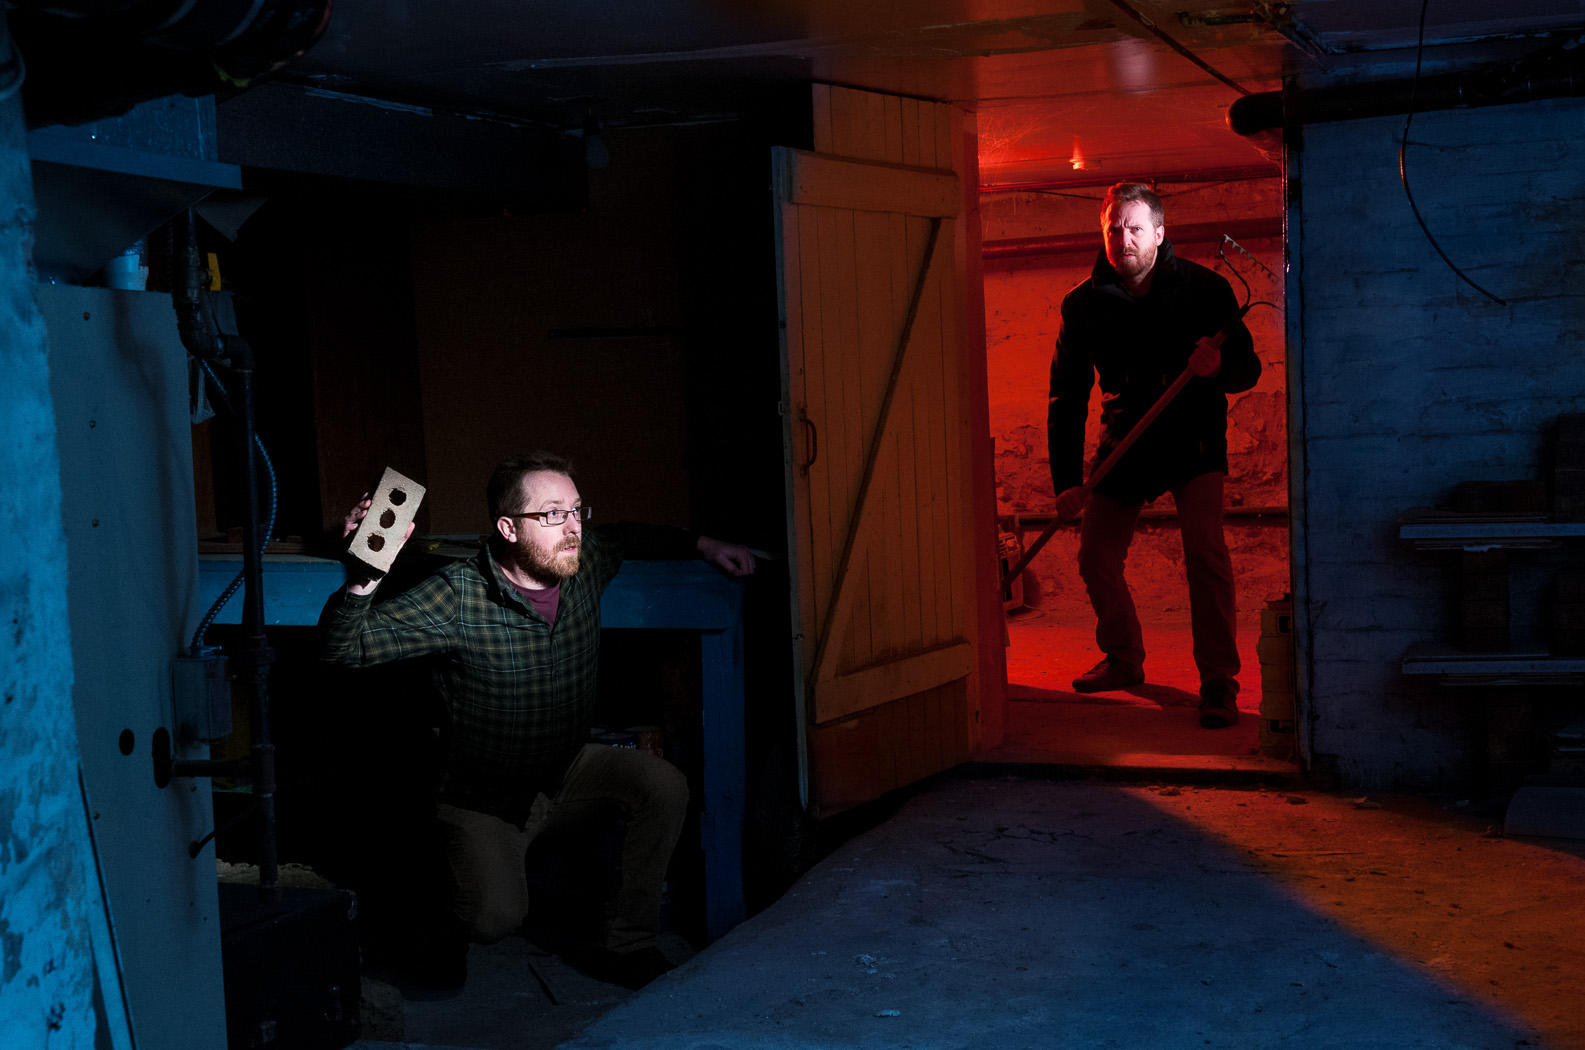
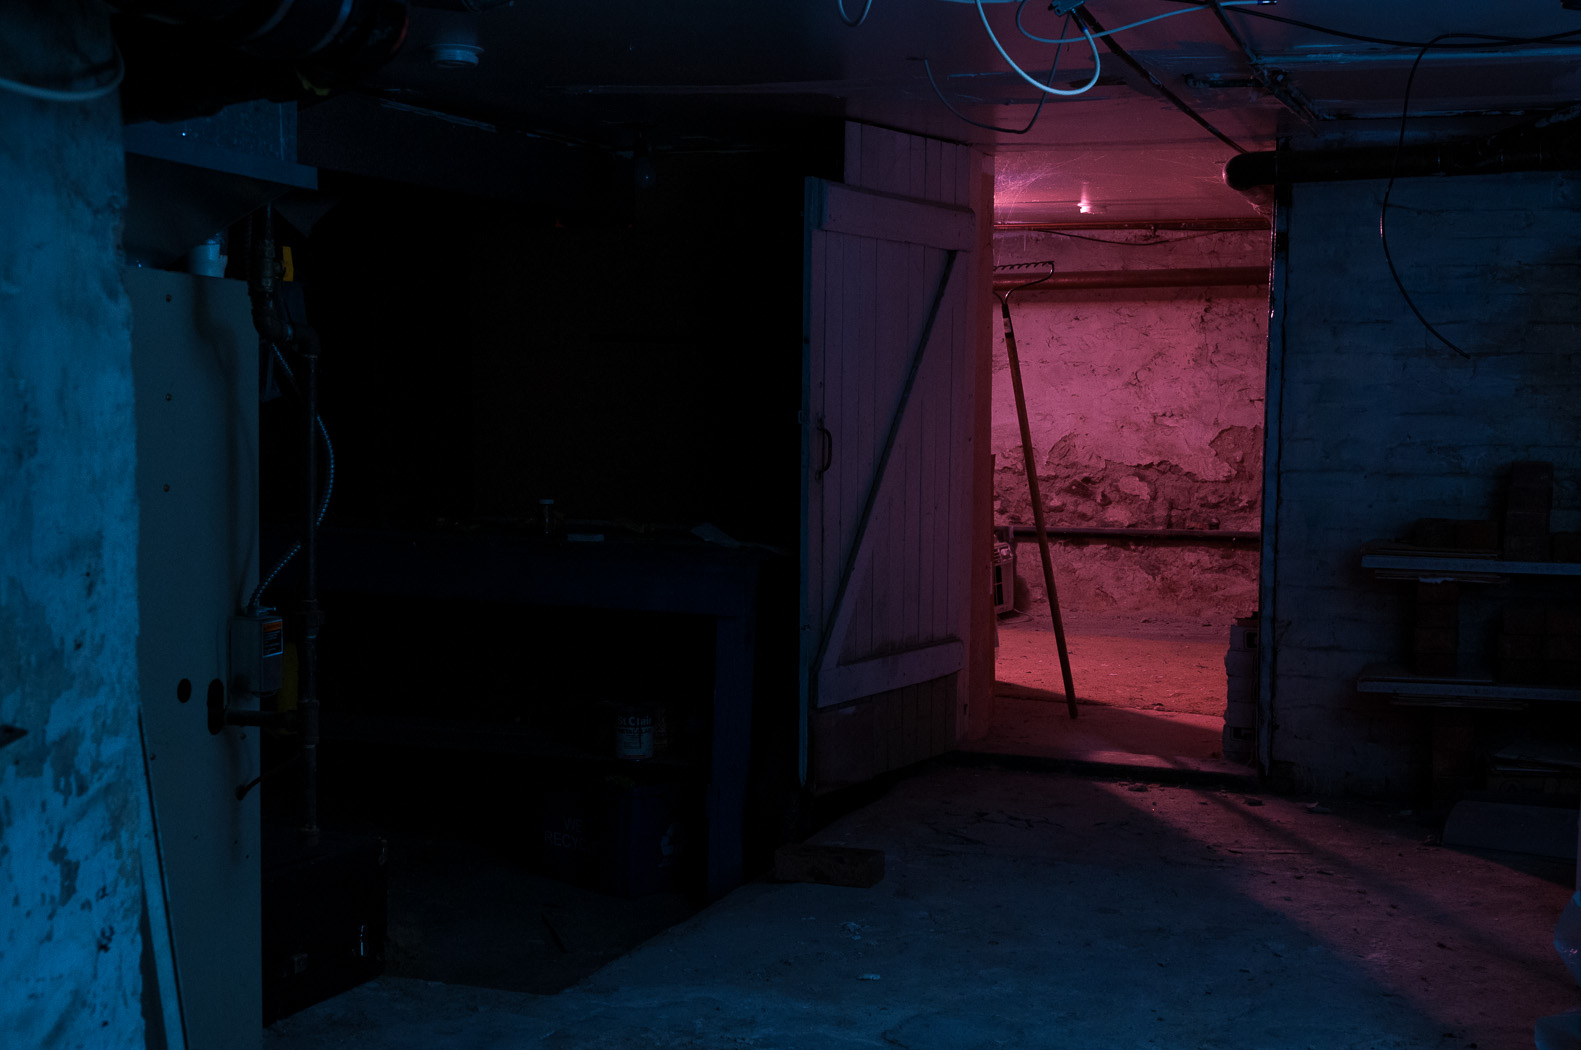
Here is my attempt at a “scary” basement photo… and double self portrait. In this post I’ll explain how I put it all together.

DSC_9718-Edit-5I’d been wanting to take a photo in my apartment’s basement for a while and was finally awarded some spare time this past week. I decided to do make the image over two nights, the first for setting up the lighting and the second for the final shots. This method gave me the time I needed to work out the lighting logistics without the stress of having to produce a result immediately. Another aspect to this image, one that is rare for me, is that I had the overall scene worked out in my head days before I actually went about doing it. I knew in advance that this would have to be a composite to include two versions of myself.

Not being someone who takes many photos with complicated lighting setups, I am limited in the equipment I have and this presented a few hurdles to overcome. Most importantly, while I own enough flashes (shoe mount and studio), I don’t have sufficient means to trigger them. I’ll get into this later.

Let’s start with the scene without any lighting. The basement is divided into three rooms and is creepy on its own.DSC_9668

To start, I put the D300s on a tripod with the AF-S 17-55mm f/2.8 set to f/8, 1/160s, ISO 400. I marked the leg locations on the floor with tape because I knew I’d have to move the tripod away from the doorway overnight.

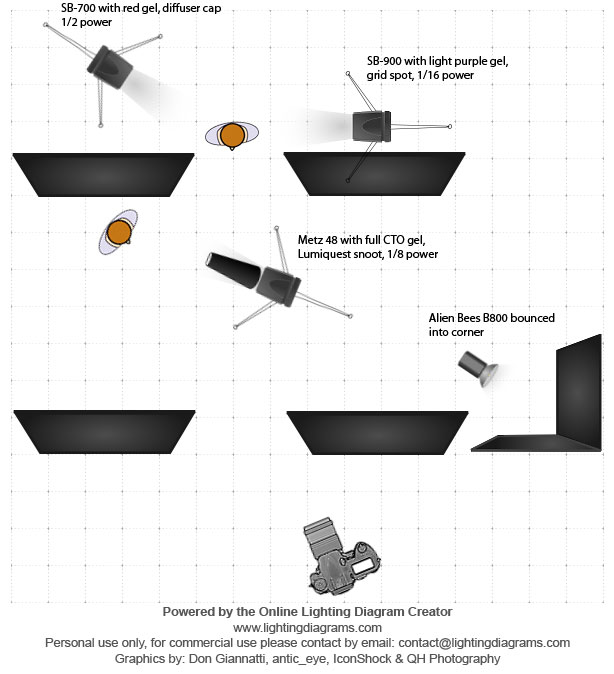
I lit the back room in red first using a Nikon SB-700 with a red gel. I added a diffuser cap, zoomed the flash out to 14mm and set it to 1/2 power to fill the room with red. I positioned the flash behind my right shoulder to give some rim light and as a fortunate consequence it projected a nice red spill onto the floor of the main room.

To make ‘evil me’ stand out I added a Nikon SB-900 with a light purple gel. I used a grid spot to keep the light on my face and not spill onto the ceiling or door frame. I kept the power at a low level of 1/16. I positioned the head of the rake within the spill of the gridded light to separate it from the red wash.DSC_9724I took the red room image with white balance set to Flash. For the main room, I wanted to have an overall blue feel to the fill. I pointed an Alien Bees B800 studio strobe into the inside corner of the room and set the camera’s white balance to Tungsten to turn the flash’s white output blue (an alternate approach would have been adding a blue gel to the flash and since making this photo I’ve picked up some gels to fit the Alien Bees’ 7′ reflectors, including a 1/2 CT blue).

I lit ‘scared me’ with a snooted Metz 48 AF-1 at 1/8 power. I added a full CTO (orange) gel that, when combined with the Tungsten white balance on the camera, gave white light. The snoot was aimed to light just my upper body and the brick.DSC_9718In order to get the right coverage from the snooted flash I had to place it right in the middle of the frame. Another image, this time with the snooted flash removed, gave me the a clear view of that area.DSC_9719Here is the lighting diagram of the three images:

lighting-diagram-scary-basement For triggering the flashes, I had to think carefully. Three of these four flashes have optical slaves. Only two of them have connectors for wireless triggers. The Metz 48 AF-1 has neither (although since this shoot I updated the firmware to include optical slave). In the end put a wireless trigger (Cybersync) on a flash in each room and triggered the other two with their optical slaves. This made optical line of sight easy, as the two slaved flashes only had to see their nearby wirelessly triggered flashes.

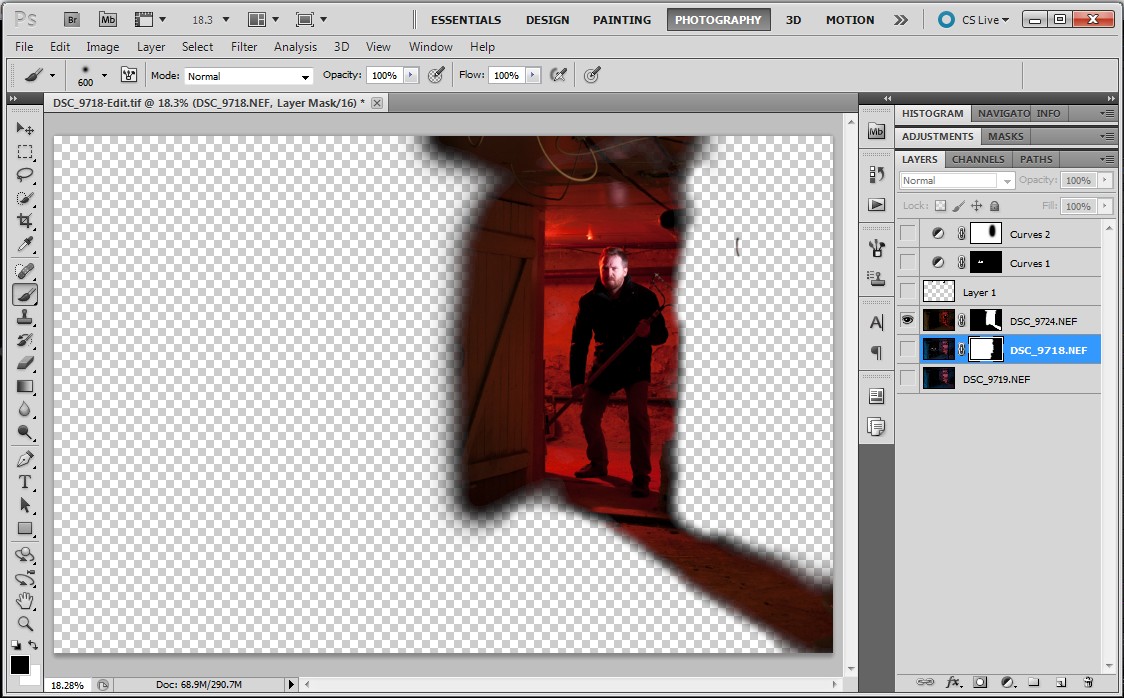
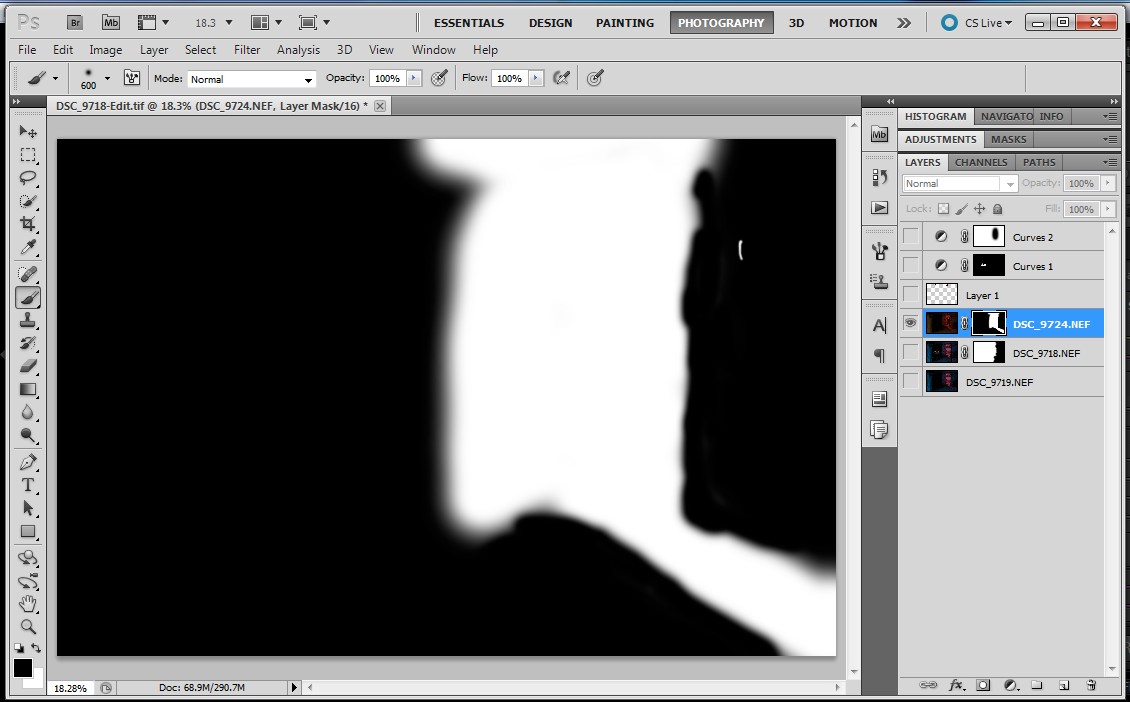
I brought the three images into photoshop and masked out the unwanted areas. With some heal/clone work to remove unwanted wires and highlights and a final curves adjustment, the image was done!

Trying a New HDR Technique with 32-Bit TIFFs

Today I came across a new high dynamic range (HDR) technique that combines Photoshop’s HDR tool with a feature that was included in the Lightroom 4.1 update that I hadn’t noticed before: the ability to edit 32-bit TIFF images. As a first attempt I processed this image (from a walk on the Lake Erie shore at Fort Erie on Christmas Eve):

DSC_9164-Edit-2The process I used was:

  • I took a series of images (minimum three) with different exposures to capture the full dynamic range of the scene. Using a tripod is best although the HDR tool in Photoshop automatically aligns the images. For the images used to create the HDR above I shot handheld with autobracketing on the D7000 for -1, 0 and +1 EV exposure compensation.
  • In Lightroom 4.1 (or newer) I did some minor tweaking of the images to prepare them for the HDR tool. First I applied automatic distortion, vignette and chromatic aberration corrections for the 35mm f/1.8 DX. Next I changed the calibration profile from ‘Adobe Standard’ to ‘Camera Neutral’ in order to reduce the contrast. Finally I adjusted the exposure settings to ensure that the darkest image included the full range of tones in the highlights and the brightest image covered the full range of tones in the shadows. The images looked like this:

DSC_9164 DSC_9165 DSC_9166

  • I exported the three images to the HDR tool in Photoshop using the ‘Merge to HDR Pro in Photoshop’ command and saved the resulting combined image as a 32-bit image. Note that Lightroom cannot read 32-bit PSD files so it is best to configure Lightroom to export as a TIFF to Photoshop.
  • With the new 32-bit file back in Lightroom I could begin editing. At first glance, the image doesn’t seem to have any more information in it than before the HDR conversion but that is because all 32 bits of data can’t be displayed at once.  Instead, it is best to think of the file as a RAW with an enormous amount of information in the highlights and shadows. Pulling the Shadows slider all the way to +100 and the Highlights slider to -100 and a reduction of the Exposure slider to taste gives the following image. This is a good demonstration of the amount of data present, but not quite a final image. 32-bit Quick AdjustWith some further tweaking in Lightroom (exposure controls, curves, saturation/vibrance, sharpening) I got reached this point:

DSC_9164-ColourAt this point I wasn’t too happy with the banding in the sky… something I’ll have to figure out for future images. In the end I opted to convert to black and white for a darker feel.

DSC_9164-Black and WhiteAnd there it is, a simple HDR technique that doesn’t use any of the tone mapping features of common methods. I prefer this approach to those with tone mapping primarily because I have full control over the edit.

Rachel and Jeremy’s Victoria Park Pavilion Wedding

In early October I was fortunate to photograph the wedding of my good friend (and former roommate), Rachel, at the Pavillion in Kitchener’s Victoria Park. Rachel and Jeremy’s fun-loving personalities brought many unique elements to their wedding including adorable decorations, a crochet wedding cake and a live photo booth projected on the stage.

RachelandJeremy-331The ceremony began with a workout routine for the audience and included a science experiment (with safety glasses, of course), vows read by the audience and a fantastic victory lap at the end. Natural light on the stage was low, so I lit the ceremony with two Alien Bees AB800 lights bounced onto opposite sides of the vast ceiling. This setup provided enough light for the processional/recessional as well, making my job a lot easier!RachelandJeremy-166 RachelandJeremy-219 RachelandJeremy-244 RachelandJeremy-249I took the massive wedding party outside for a photo in front of the pavilion. Not having a ladder, I held the D300s with AF-S 17-55mm f/2.8 above my head and took a series of images at 17mm f/5.6 adjust the framing slightly for each shot. I learned this trick watching a newspaper photographer cover a large crowd scene with his D2h. He held the camera high up and shot at max frame rate while moving panning the camera up/down/left/right.RachelandJeremy-310Alone with the bride and groom (along with videographers and Mike Portt, who was assisting) I captured these images. The first is a panorama of many shots with the D7000 and Sigma 50/1.4 at f/1.4.RachelandJeremy-329The next are with the Sigma and a rented AF-S 24mm f/1.4, respectively. The weather was unfortunately cold and I felt bad keeping Rachel and Jeremy outside even for the short time that I did.RachelandJeremy-397 RachelandJeremy-392After portraits, I set up the Alien Bees again for lighting the rest of the evening. By placing one on the stage and the other high up at the back corner I was able to light the entire room. I think I’ll write a full blog post on this technique as it has worked well for me. The studio flashes run off AC power and recharge quickly, giving consistent and reliable output.RachelandJeremy-525Here is a shot of the crochet cake followed by the “cake cutting”. RachelandJeremy-436 RachelandJeremy-462For lighting many of the candids I used my new favourite technique of holding the camera in my right hand with something wide and an off-camera strobe in my left hand. Here, I put the Lumiquest Softbox LTz on an SB-900 set to be triggered in TTL with the camera’s built-in flash. The softbox at this range puts out even and soft light, sufficient for a pair of people.RachelandJeremy-597The dance party was started off with an amazing ceilidh that got nearly everybody on their feet. Using the Alien Bees to light the room and playing with shutter speed to control the ambient light I was able to achieve a wide range of looks, from frozen motion to slow speed sync.RachelandJeremy-556 RachelandJeremy-591I’ll end this post with the cutest gift card box I’ve ever seen. Rachel and Jeremy’s wedding was a real treat and I wish them the best! Thanks for reading.

RachelandJeremy-15

Creating a Wedding Party Composite with Flash

I’ve had a request to explain in more detail how I achieved the wedding party composite from yesterday’s post. I borrowed the idea from Ryan Brenizer, who uses this technique very effectively to achieve dramatic (but even) lighting over a group of people. This would be extremely difficult with a single or pair of flashes in a single image, especially on the fly and in the wild.

Here’s how it’s done.

First I set the camera (D300s with AF-S 17-55mm f/2.8 @ 17mm) on a tripod to keep the framing the same between each shot. I used manual mode to ensure consistent exposure. Settings of ISO 200, f/8, 1/250s gave this look:

DSC_6107

The ambient light is at least a stop underexposed, which is right where I wanted it. The next step was to set up the flash. I used a Nikon SB-900 set to wireless TTL control (the Nikon CLS system is powerful and complicated… something I’m sure I’ll delve into explaining in another post) and triggered with the on-board flash. To diffuse and soften the light, I added my favourite light mod, the Lumiquest Softbox LTz. This softbox mounts to the flash with velcro and folds up to the size of a 17″ laptop, which most camera bags nowadays have a slot for. Portt, who was assisting me that day, held the flash up close to each pair of people and I took a shot for each position.

DSC_6111DSC_6112


DSC_6113DSC_6114DSC_6115

In Lightroom, I batch processed the five images for exposure, lens correction, sharpening and then opened them in Photoshop as layers in a single file. Using the first image as a base layer, I painted in the relevant bits from the successive layers and finished things off with some global and local curves and dodging/burning. Here’s the final image:

DSC_6111-Edit

To get this look in a single image would have required some pretty tricky lighting, both to light each person evenly and to control the spill on the background. In all, the composite took just a few minutes to shoot and less than half an hour in Photoshop. An added bonus to shooting each pair separately is that I can focus on just two faces at a time (i.e. no blinkers).

A Photo Day at the Don Valley Brick Works

Portt and I had a great photo adventure at the Brick Works this past May. Naturally, we were armed with way more gear than we should have been. Although far more developed than the last time I’d visited (over 10 years ago) there are still many cool details that reflect how the building once was.

Here are a few shots with the D7000 and Nikon 35mm f/1.8

Brick Works Detail

Portt at the Brick Works

And some HDRs with the Nikon 17-55mm f/2.8

Don Valley Brick Works

Don Valley Brick Works

This next shot was with the D300s and 17-55. I’m using two lights, controlled by CLS and triggered from the onboard flash.  The rim light, coming from the back right of the image is a snooted SB-700 at +1EV. The main light is a SB-900 with full CTO gel through a Lumiquest Softbox LTz at +3EV. Exposure compensation on the camera was dialed down to -2EV to dim the ambient and WB was set to Tungsten to cool everything down.

Portt at the Brick Works

This setup is extremely portable. Two small light stands and two Speedlights. The Lumiquest snoot and softbox both fit in the laptop slot of my camera bag.

Finally, here are couple shots with the Bronica ETRS. First, with the 75mm f/2.8 EII and second with the 40mm f/4 MC.

Brick Works Detail

Brick Works

Thanks for looking!