Multiple Exposure Mode with Nikon D810

A couple of months ago I was researching neutral density filters for long exposure landscape photography when I came across a forum post describing an alternative. I learned that Nikon’s DSLRs will add a number of exposures together (the maximum depends on the body) into a NEF RAW file with what they call “Multiple Exposure” mode. The summation of the set of images into a single file has an effect similar to a long exposure. In some cases it has an even bigger effect because you can control the delay between each exposure, something useful when blurring moving clouds, for example. The advantage of doing this in camera is that the output is a RAW file, making it much more editable (or so I’d expected).

I first tried out the mode in Elora, Ontario in the gorge where the Irvine Creek meets the Grand River. I brought water sandals so that I could stand in the river and my tripod with ball head for quick and easy framing. I mainly used the AF-S 18-35mm f/3.5-4.5g on the D810. I added a circular polarizer to cut down on glare, remove reflections from the water and slow down the shutter speed by a couple of stops.

I shot at in aperture priority, f/11 to f/16 at ISO Low 1 (ISO 31). Shutter speeds varied from 0.5 to 1.6 seconds. After framing and taking a test image I  set the camera to sum 10 shots with auto gain on. With auto gain the camera takes 10 shots, each at 1/10th of the total exposure (I assume shutter speed) and then adds them together to match the total exposure as if it had been one shot. In fact, the EXIF data reports the conditions as if it had been one photo. I was pretty happy with the way the photos looked! The water was blurred but the non-moving scenery was nice and sharp. After downloading the images to my computer and trying some edits in Lightroom my happiness faded.

The first thing I noticed was the that blacks were heavily clipped and stayed totally black with adjustments. Later I found that sections of water were posterized. The D810 is a camera with fantastic dynamic range and this was something I’d never seen before. Here is an example:
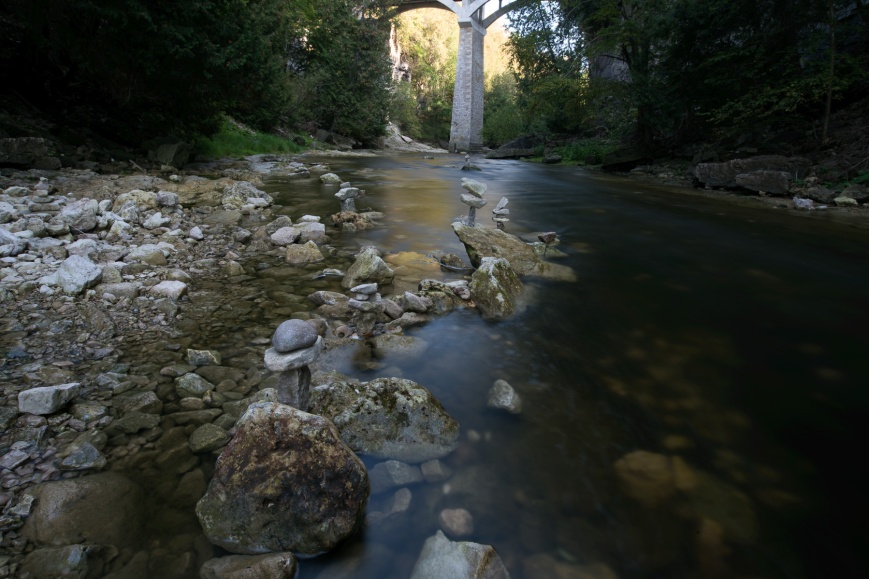
DSC_8831-2

Above is the NEF using just Lightroom’s default import settings. Below is the image after some normal edits.
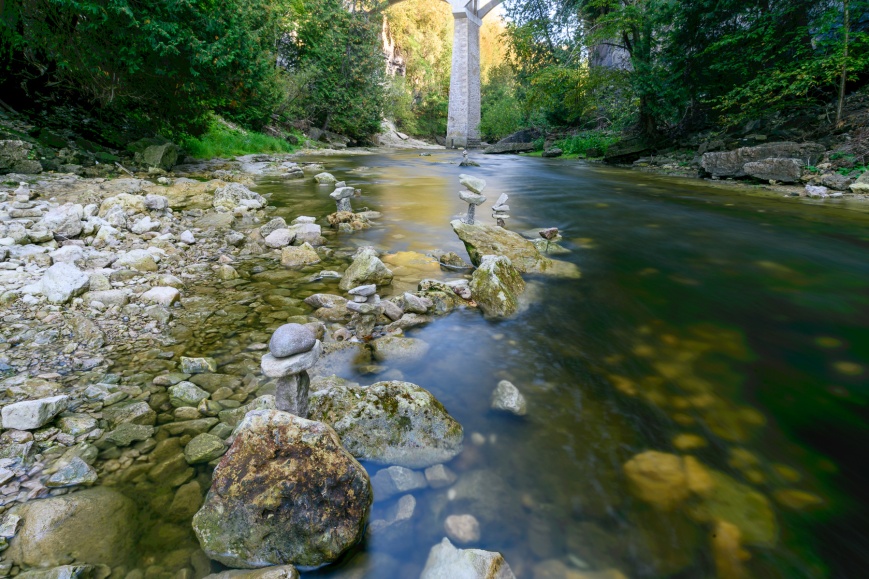
DSC_8831

Here are a couple of crops, showing clipping at the top left and posterization on the bottom left.

I had a hunch. I checked the image settings and confirmed that I was shooting in 12 bits. The D810 is capable of generating 14 bit files but I don’t use them because I’ve honestly never needed to. However, in multiple exposure mode each of the images that make up the final image is shot underexposed.

In 12 bits images there are 4096 DN (digital numbers, or signal levels). Let’s say a very dark object uses 10 DN in a 12 bit image. Now, when shooting in multiple exposure mode with 10 images, that 10 DN object is only going to be 1 DN in each of the images because the exposure is 1/10th of normal. 1 DN is well into the noise floor and could even show up as 0 DN (i.e. clipped). When adding the 10 images together, all those noise-limited pixels remain clipped or at least heavily affected by noise. 14 bit images have 16384 DN worth of information. The same dark object that was 10 DN in 12 bit mode would be 40 DN in 14 bit mode. At 1/10th of the exposure you’d have 4 DN of signal, which is much less likely to clip.

Likewise, smoothly varying features like water and sky lose a lot of data when underexposed and can become posterized.

To test my theory I took a series of shots, all underexposed by about 3 stops. They all started off like this:

DSC_8836

I then brightened each image to a normal exposure. First I’ll show the two images that were not multiple exposure (left is 12 bit and right is 14 bit):

Apart from slight exposure difference, they’re pretty much the same. Now, the 10 shot multiple exposure images (again, 12 bits on the left and 14 bits on the right):

The 12 bit image is horrible! The 14 bit image is pretty good. Looking closely it’s still not perfect compared to the single 14 bit image but still passable. I haven’t found any discussion of this condition online which is why I’m writing this post.

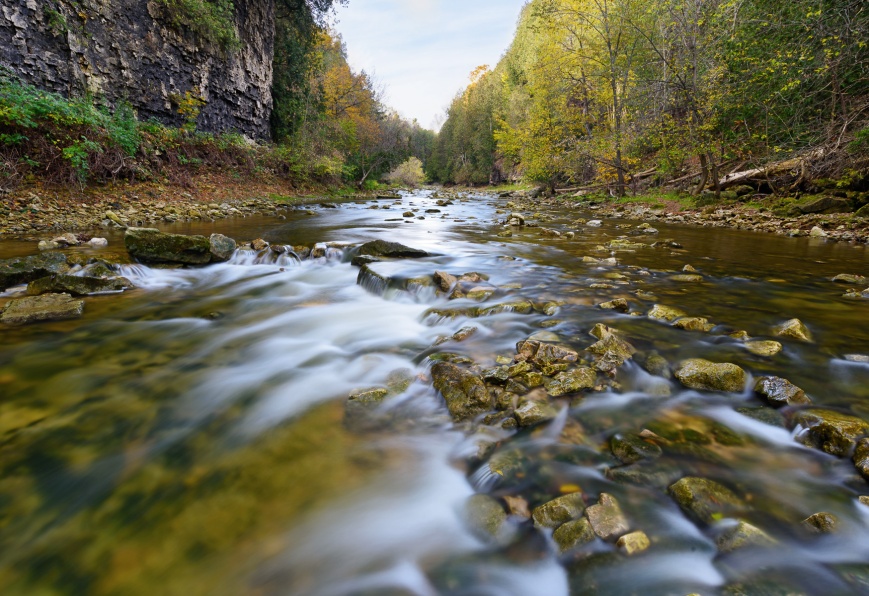
With my newfound knowledge, I returned to Elora a few weeks later and this time shot entirely in 14 bit mode. I think the outcome was much better!
DSC_9201-Edit-2

Thanks for reading!

Blending with Soft Light – A Quick and Simple Way to Increase Contrast and Saturation in Photoshop

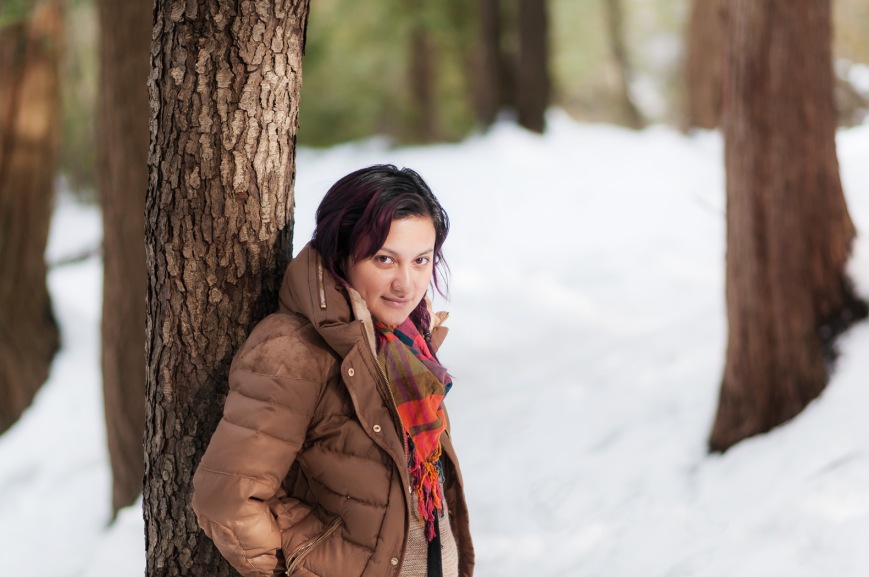
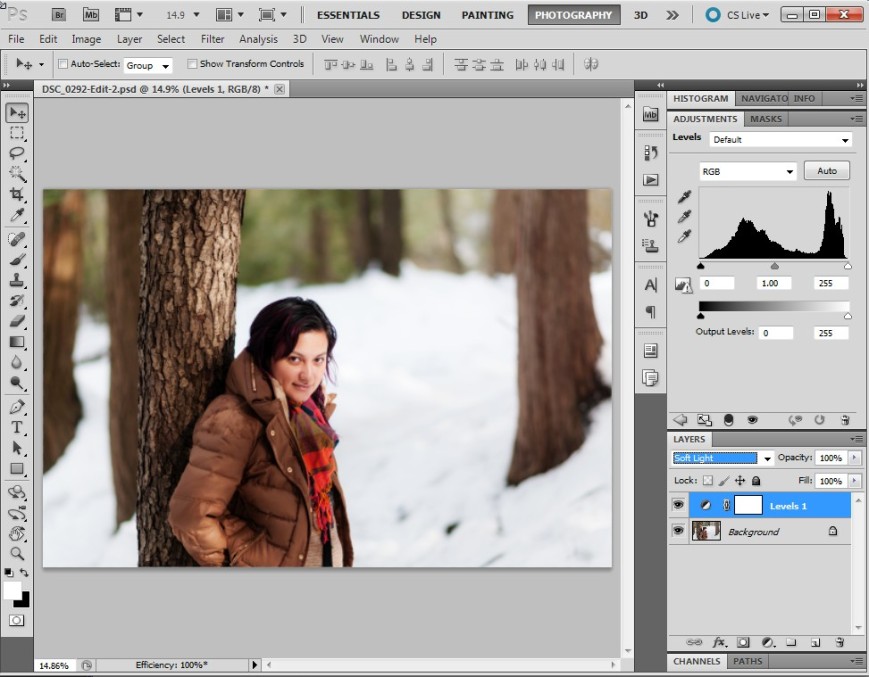
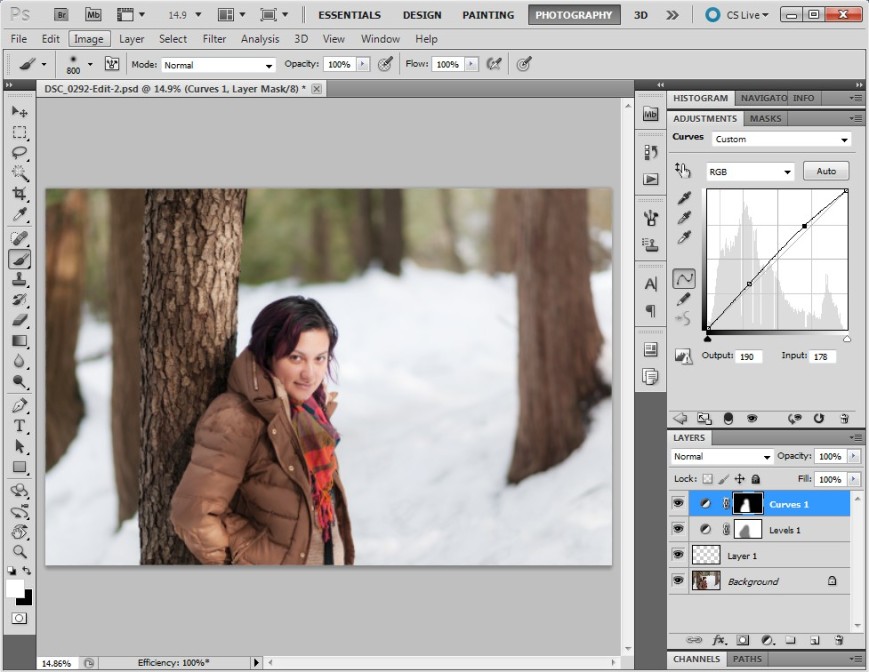
DSC_0292-Edit-2Today I’d like to show you a really effective, but simple, way to boost contrast and saturation in an image by walking through how I arrived at the above image. The trick is using a layer blending mode called ‘Soft Light’. Photoshop has the ability to blend different layers with each other using a number of methods. The Soft Light mode works like this:

  • Areas that are brighter than 50% grey get ‘screened’, meaning they become lighter depending on the lightness of the lower layer.
  • Areas that are darker than 50% grey get ‘multiplied’, meaning they become darker depending on the darkness of the lower layer.

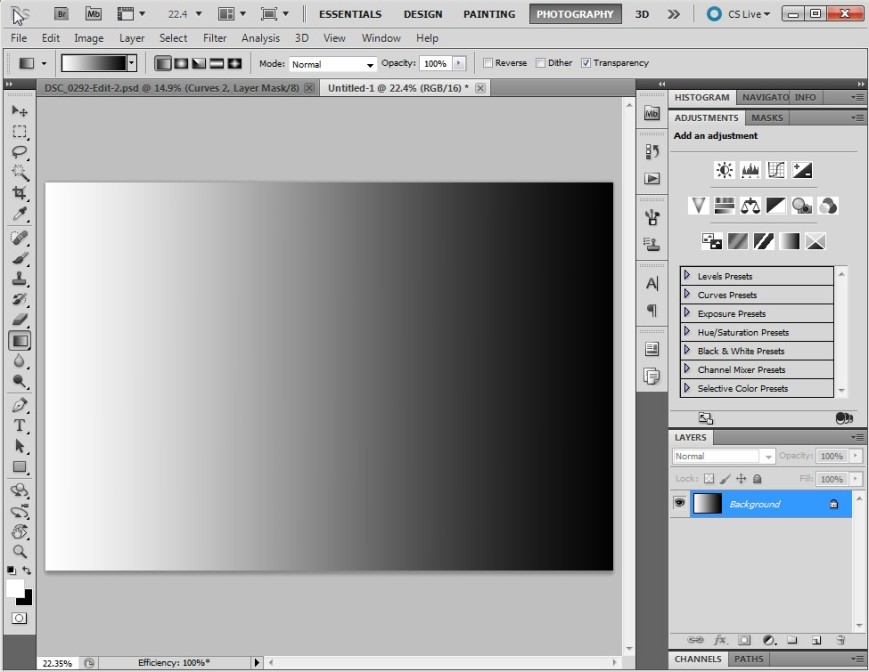
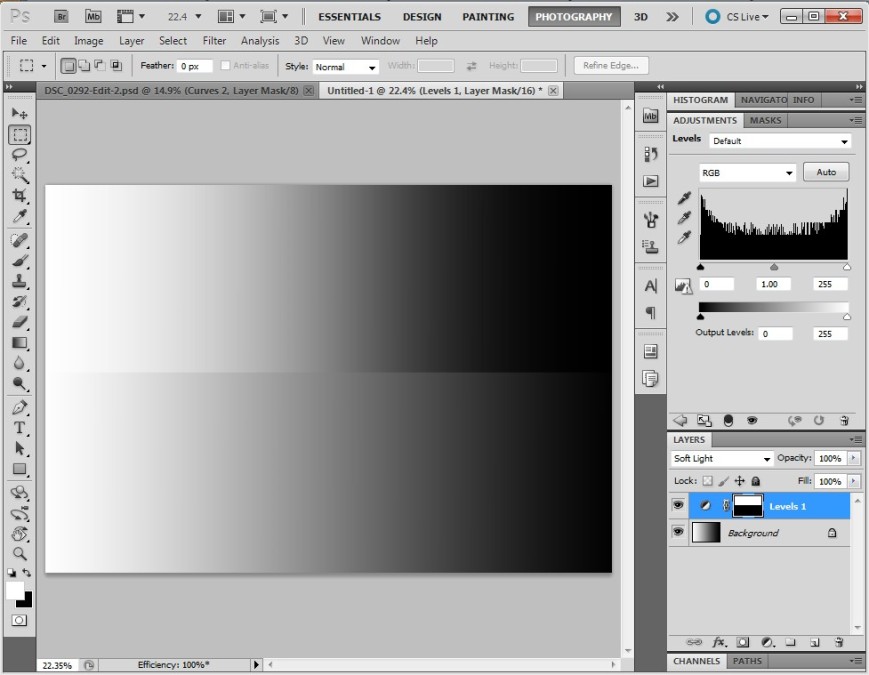
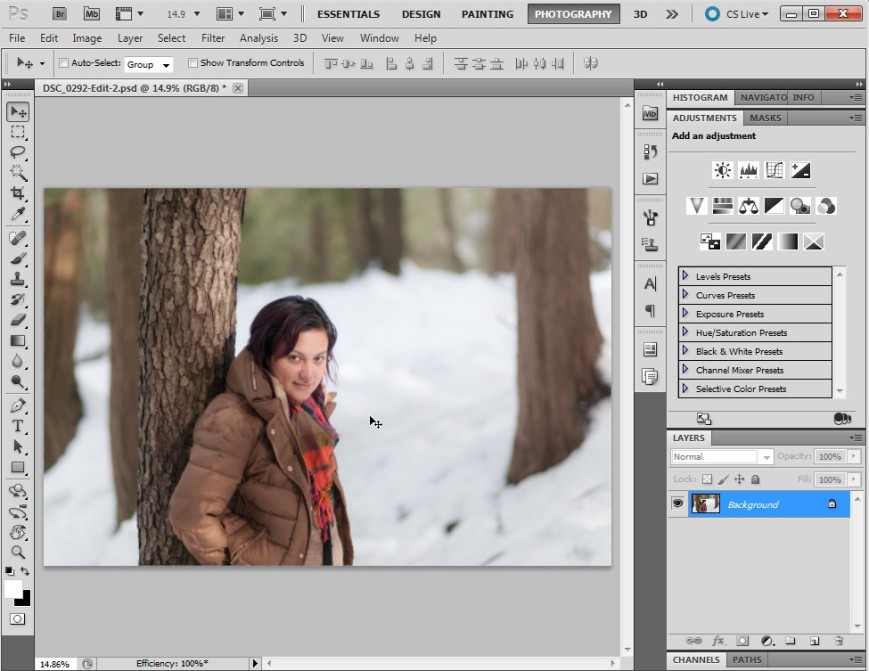
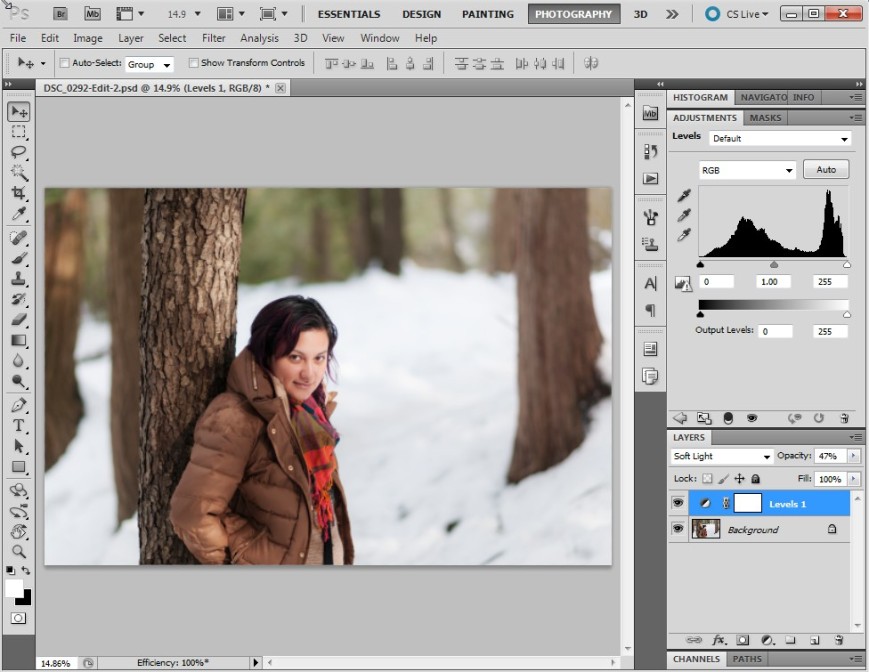
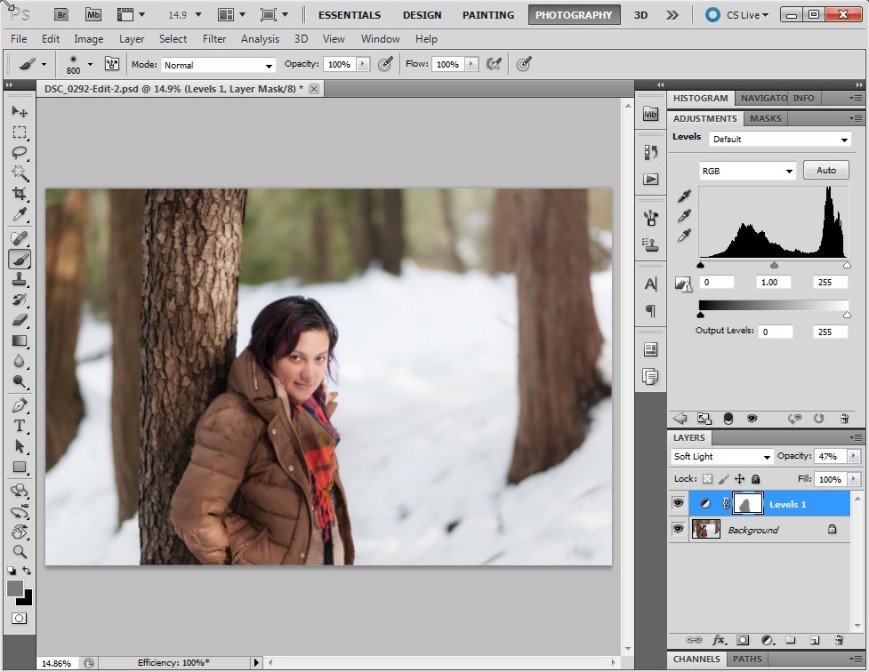
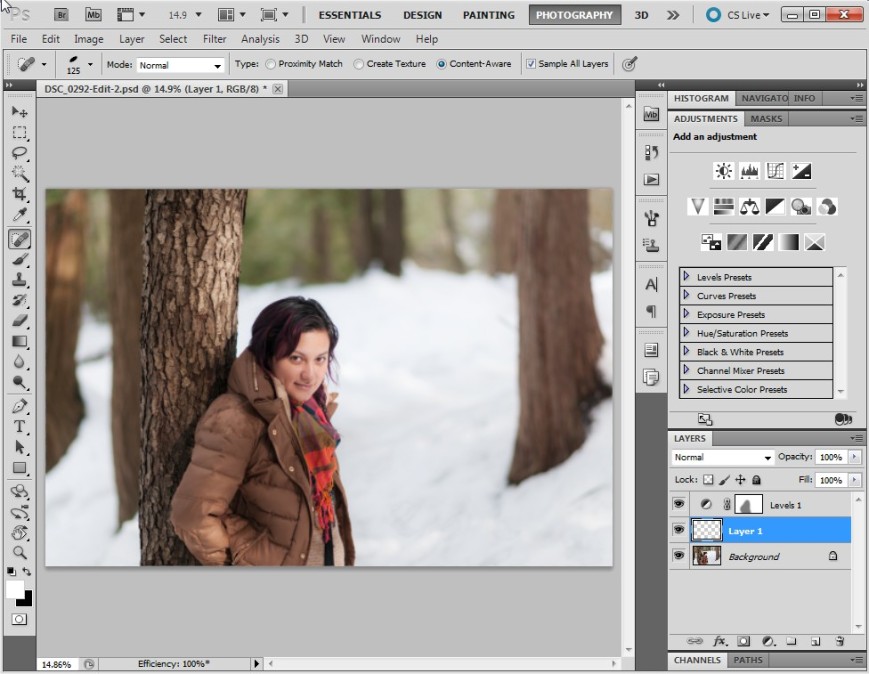
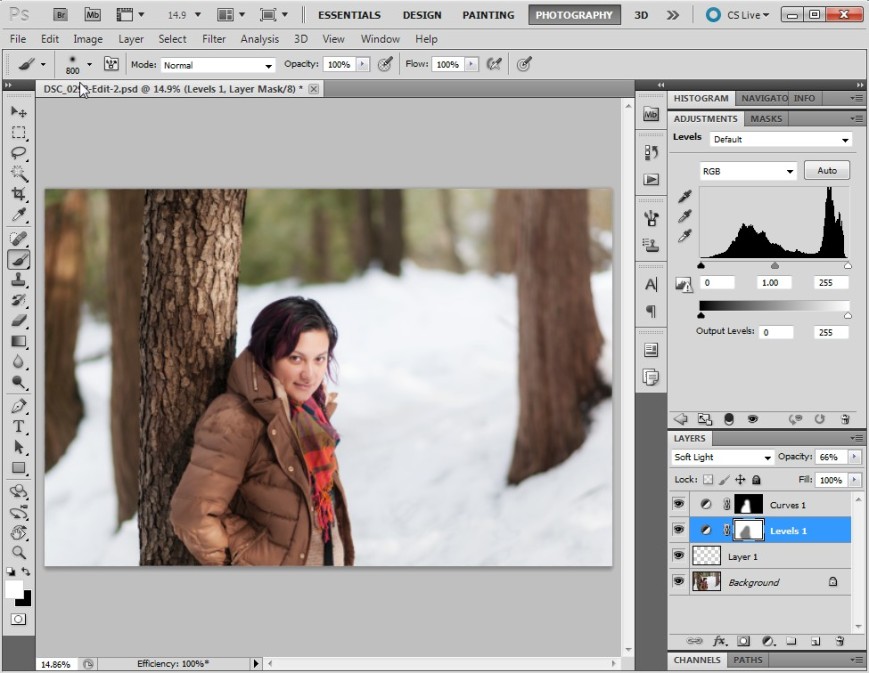
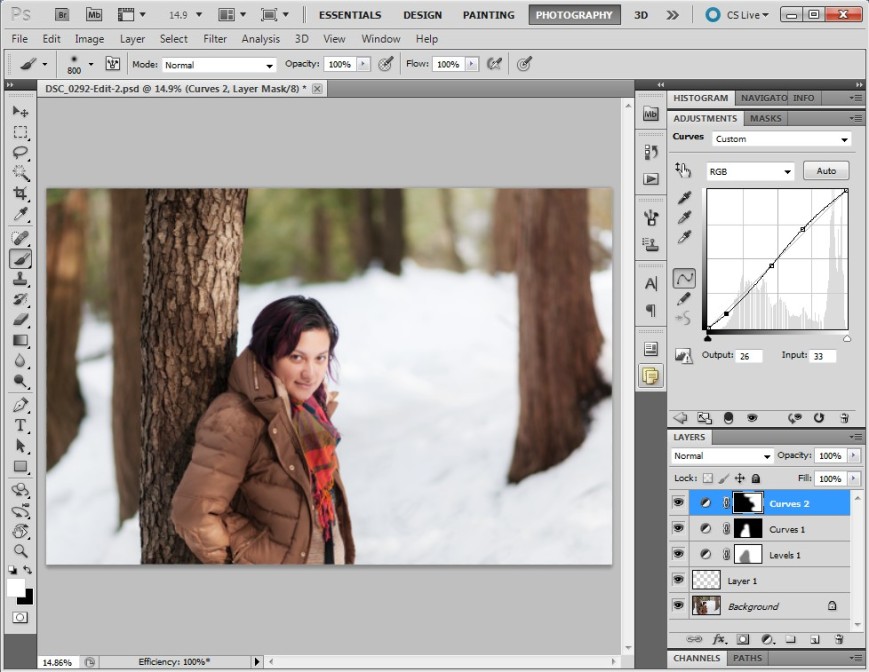
I’ll demonstrate. Here is a layer in Photoshop that is a simple gradient going from white to black, left to right. In the middle is 50% grey.ScreenHunter_16 Mar. 12 20.32If I add an adjustment layer on top of this, say ‘Levels’, and change its blending mode to Soft Light the lights get lighter and the darks get darker depending on how light or dark they are. In the middle, 50% grey, is unaffected. In the image below, the top half has been blended with Soft Light. The bottom half is the same as the previous image. Notice that the gradient becomes more steep… the transition between white and black is shorter. This is an increase in contrast.ScreenHunter_16 Mar. 12 20.35In an image with colour, Soft Light blending can also increase saturation. I’ll demonstrate with an image. First, I’ll show the image as it is first pulled out of Lightroom into Photoshop.ScreenHunter_13 Mar. 12 19.57If I add a Levels layer and blend it with Soft Light the contrast and saturation increase dramatically.ScreenHunter_15 Mar. 12 19.57I can scale the effect back by lowering the opacity. Here I’ve set it to 47%:ScreenHunter_15 Mar. 12 19.58I’m finding that there’s still too much of an effect on Mitzy so I’ll paint some grey into the layer mask over her. Grey will decrease the opacity of the mask by another 50% where I’ve painted it in.ScreenHunter_16 Mar. 12 20.00I’m happy with how the Soft Light blending has improved the image so let’s finish it off. First, I’ll remove some of the messy details in the bottom right corner using the Spot Heal Brush in a new layer.ScreenHunter_16 Mar. 12 20.04Next I’ll brighten Mitzy a bit further using a curves tool, masked so it only affects her.ScreenHunter_16 Mar. 12 20.05Here, I’ve decided that I want to bring a bit more of the contrast back in to the background so I increase the opacity of the Soft Light layer.ScreenHunter_16 Mar. 12 20.06Finally, I add a bit more contrast into the right side of the image with a masked Curves tool. The image is done!ScreenHunter_16 Mar. 12 20.08So there have it. Soft Light blending. Quick and simple!

Meet Easton Nathanael Persaud

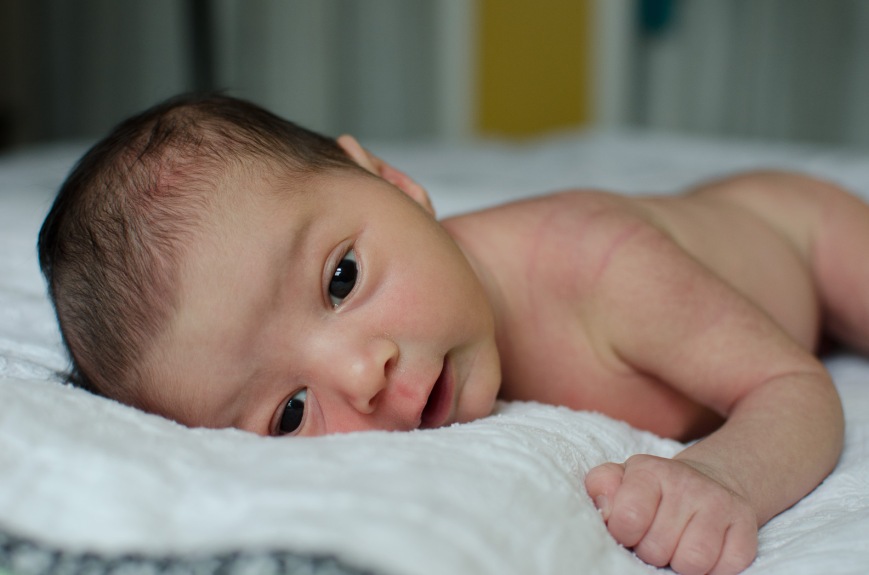
Nat and Lauren, some of my best friends, have a new member of the family as of February 7. Easton Nathanael is an adorable baby boy and I feel so lucky to have met him when he was just 8 hours old. Lauren and Nat had Mitzy and me over on Saturday to take some photos of the new family of 4. I haven’t had a lot of experience with baby photography but I love shooting their kids. Their daughter, Harper, has become quite the photogenic toddler especially now that she’s warmed up to me. Here is one of my favourites (D7000 with AF-S 35mm f/1.8 @ f/2.8 1/200s ISO 400):DSC_9809-Edit-2To give a bit of editing history, here is the image when first imported into Lightroom.DSC_9809-2In Lightroom I did a few tweaks to prepare the shot for editing in Photoshop, namely

  • highlight reduction/shadow boost
  • reduced clarity/increased sharpness
  • vibrance reduction
  • lens correction
  • ‘Camera Portrait’ camera calibration

This is how the photo looked coming out of Lightroom:DSC_9809In Photoshop I removed some dry skin and red patches (under the nose and the lines on the shoulder). I used the color correction tool to shift some of the magenta tones in the skin towards the green and some local reduction of red saturation. I tried out a new Photoshop preset (a gift from a friend) to get the final look.

Enjoy!

Lighting Candid Photos with Handheld Flash

When photographing candids in a dark environment, there are many options for lighting. One could choose to use the camera’s built-in flash, but that gives harsh shadows and terrible red eye. Adding a speedlight (flash) to the hotshoe and firing it directly moves the light source a bit off axis, but shadows are still harsh and red eye is still a risk. Diffusing the light, say with a Gary Fong Lightsphere or a Lumiquest Softbox (both of which mount directly to the head of the shoe-mounted flash), helps too. However, the light is still on axis.

A very common solution, and one which I often use, is to tilt the strobe head up and bounce it from a ceiling or wall. This effectively provides a large off-axis light source, giving a very soft fill. However, if the ceiling is quite high, non-white, or not there at all bouncing just won’t work. Even if bouncing does work, the fill is still quite soft and undramatic.

A lighting solution that I’ve been working with for the past while is to hold the flash in one hand while shooting with the other. I put a diffusion on the flash, usually a Lumiquest Softbox LTz and hold it with my left arm outstretched at about 30 degrees from horizontal. This method gives soft (but not too soft) off-axis light that is easily under my control.DSC_8341I trigger the flash (Nikon SB-900 or SB-700) using Nikon’s CLS (Creative Lighting System). I set the camera’s built-in flash as a “controller” so that it will control remote flashes but not add to the exposure. If I had set it to be a “master” it would fire as part of the exposure. I then set the handheld flash to be a remote, making sure that both it and the built-in flash are set to the same channel and group. (Note: Nikon CLS isn’t actually that complicated once you figure out all of the terminology. I found this site to be extremely useful.)

DSC_8347Of course, having more than one light source usually improves a photo even more. In the case of a wedding I did this fall in a barn, the light shining through the windows and poking through cracks in the wall provided an excellent backlight to complement the light from my flash.DSC_6378DSC_6429 DSC_6436 DSC_6427Thanks for reading!

The Making of a Scary Basement Photos – Part 2 (Editing)

I’d like to follow up my previous post with a more detailed explanation of how I pieced the composite image together and achieved the final look. Certain aspects of Photoshop, or photo editing in general, may seem like black art but in this case the process is fairly straightforward. I use two common image editing programs:

  • Adobe Photoshop Lightroom 4 (currently at v4.3)
  • Adobe Photoshop CS5

As I mentioned in the last post I started the process of taking this image with the final product in mind, simplifying the editing process considerably.

DSC_9718-Edit-5The first step, as in all my post-production, was to import the images into Lightroom. For those who don’t know, Lightroom is an extremely versatile program that provides a near-complete workflow from import, sort, edit, print, upload plus simple tools for generating slide shows, webpages and books. I do 95% of my editing in Lightroom and usually only go to Photoshop for complicated edits like cloning and healing or anything where layers are required.

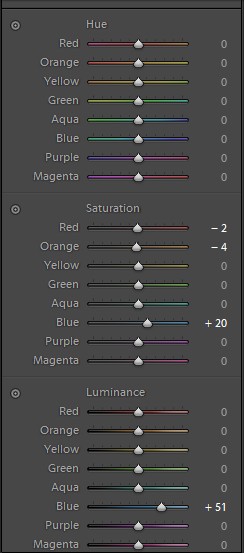
ScreenHunter_02 Jan. 11 16.42With the image of the blue room I adjusted the levels to get the brightness/contrast I wanted. I tuned the blue colour of the room with a white balance adjustment and the hue/saturation/luminance controls. I also used this control to reduce the red and orange saturation on my face.ScreenHunter_03 Jan. 11 16.44If you recall from the previous post I took a second image of the blue room with the snooted flash removed. I copied all of the adjustments from above over to this image. With the red room, I made minimal adjustments. I tweaked the white balance and increased saturation. I added some blacks to increase contrast.ScreenHunter_04 Jan. 11 16.46When finished in Lightroom I opened the three images as layers in a single Photoshop file in the following order: empty blue room > blue room with me > red room. I selected the three layers and used the Auto-Align Layers tool (in Automatic mode) to remove any misalignment from slight camera movements between shots. ScreenHunter_06 Jan. 11 16.52I masked off the right side of the “blue me” layer (to allow the underlying empty room to come through). The first image below is the resulting layer and the second image is the mask used to create it.ScreenHunter_05 Jan. 11 16.51ScreenHunter_08 Jan. 11 16.52The red room required a more complex mask to keep the red on the door and floor but not spill onto the door frame on the right side.ScreenHunter_09 Jan. 11 16.53 ScreenHunter_10 Jan. 11 16.53The three layers, when all visible, appear like this:ScreenHunter_10 Jan. 11 16.54My next step was to remove blemishes such as the smoke alarm in the blue room and some messy cables. For this I created a new layer above the three image layers. I set the healing brush and clone stamp tools to sample from all layers below. The edits appeared in the new layer, leaving the underlying layers untouched. This method makes the removal of healing/cloning edits much simpler because they can be deleted from the self-contained layer. Here is the layer containing the edits.ScreenHunter_11 Jan. 11 16.54As a final adjustment I added a curves adjustment, again as a new layer but masked off the red room.ScreenHunter_11 Jan. 11 16.55Here is the final image in Photoshop:ScreenHunter_12 Jan. 11 16.56Finally, I opened the image up in Lightroom and cropped on a slight angle to add a bit of drama.DSC_9718-Edit-5Thanks for reading!

The Making of a Scary Basement Photo

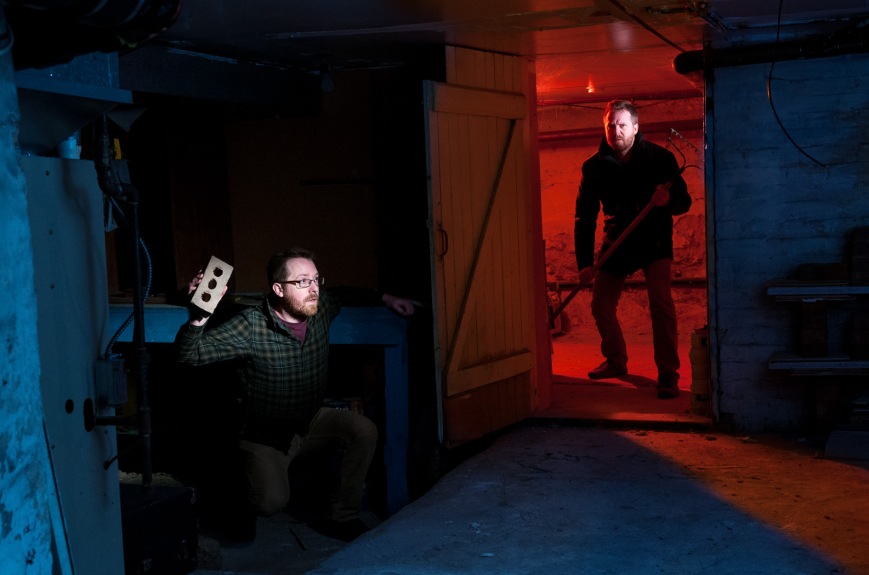
Here is my attempt at a “scary” basement photo… and double self portrait. In this post I’ll explain how I put it all together.

DSC_9718-Edit-5I’d been wanting to take a photo in my apartment’s basement for a while and was finally awarded some spare time this past week. I decided to do make the image over two nights, the first for setting up the lighting and the second for the final shots. This method gave me the time I needed to work out the lighting logistics without the stress of having to produce a result immediately. Another aspect to this image, one that is rare for me, is that I had the overall scene worked out in my head days before I actually went about doing it. I knew in advance that this would have to be a composite to include two versions of myself.

Not being someone who takes many photos with complicated lighting setups, I am limited in the equipment I have and this presented a few hurdles to overcome. Most importantly, while I own enough flashes (shoe mount and studio), I don’t have sufficient means to trigger them. I’ll get into this later.

Let’s start with the scene without any lighting. The basement is divided into three rooms and is creepy on its own.DSC_9668

To start, I put the D300s on a tripod with the AF-S 17-55mm f/2.8 set to f/8, 1/160s, ISO 400. I marked the leg locations on the floor with tape because I knew I’d have to move the tripod away from the doorway overnight.

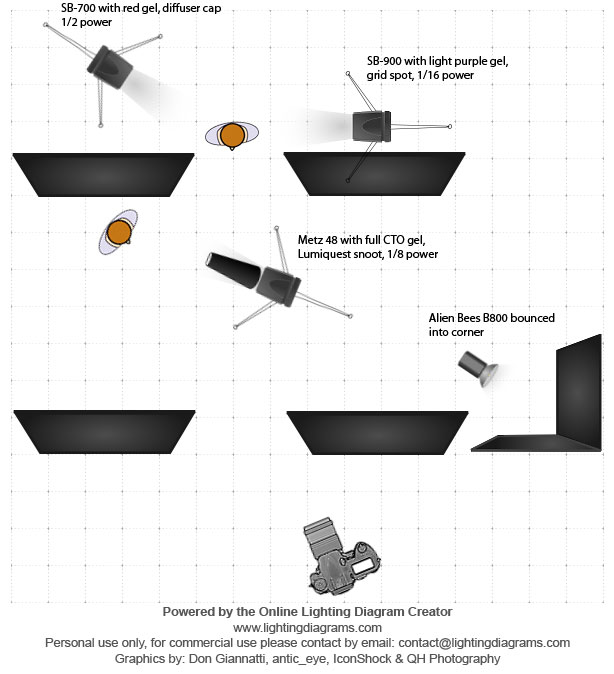
I lit the back room in red first using a Nikon SB-700 with a red gel. I added a diffuser cap, zoomed the flash out to 14mm and set it to 1/2 power to fill the room with red. I positioned the flash behind my right shoulder to give some rim light and as a fortunate consequence it projected a nice red spill onto the floor of the main room.

To make ‘evil me’ stand out I added a Nikon SB-900 with a light purple gel. I used a grid spot to keep the light on my face and not spill onto the ceiling or door frame. I kept the power at a low level of 1/16. I positioned the head of the rake within the spill of the gridded light to separate it from the red wash.DSC_9724I took the red room image with white balance set to Flash. For the main room, I wanted to have an overall blue feel to the fill. I pointed an Alien Bees B800 studio strobe into the inside corner of the room and set the camera’s white balance to Tungsten to turn the flash’s white output blue (an alternate approach would have been adding a blue gel to the flash and since making this photo I’ve picked up some gels to fit the Alien Bees’ 7′ reflectors, including a 1/2 CT blue).

I lit ‘scared me’ with a snooted Metz 48 AF-1 at 1/8 power. I added a full CTO (orange) gel that, when combined with the Tungsten white balance on the camera, gave white light. The snoot was aimed to light just my upper body and the brick.DSC_9718In order to get the right coverage from the snooted flash I had to place it right in the middle of the frame. Another image, this time with the snooted flash removed, gave me the a clear view of that area.DSC_9719Here is the lighting diagram of the three images:

lighting-diagram-scary-basement For triggering the flashes, I had to think carefully. Three of these four flashes have optical slaves. Only two of them have connectors for wireless triggers. The Metz 48 AF-1 has neither (although since this shoot I updated the firmware to include optical slave). In the end put a wireless trigger (Cybersync) on a flash in each room and triggered the other two with their optical slaves. This made optical line of sight easy, as the two slaved flashes only had to see their nearby wirelessly triggered flashes.

I brought the three images into photoshop and masked out the unwanted areas. With some heal/clone work to remove unwanted wires and highlights and a final curves adjustment, the image was done!
Trying a New HDR Technique with 32-Bit TIFFs

Today I came across a new high dynamic range (HDR) technique that combines Photoshop’s HDR tool with a feature that was included in the Lightroom 4.1 update that I hadn’t noticed before: the ability to edit 32-bit TIFF images. As a first attempt I processed this image (from a walk on the Lake Erie shore at Fort Erie on Christmas Eve):

DSC_9164-Edit-2The process I used was:

  • I took a series of images (minimum three) with different exposures to capture the full dynamic range of the scene. Using a tripod is best although the HDR tool in Photoshop automatically aligns the images. For the images used to create the HDR above I shot handheld with autobracketing on the D7000 for -1, 0 and +1 EV exposure compensation.
  • In Lightroom 4.1 (or newer) I did some minor tweaking of the images to prepare them for the HDR tool. First I applied automatic distortion, vignette and chromatic aberration corrections for the 35mm f/1.8 DX. Next I changed the calibration profile from ‘Adobe Standard’ to ‘Camera Neutral’ in order to reduce the contrast. Finally I adjusted the exposure settings to ensure that the darkest image included the full range of tones in the highlights and the brightest image covered the full range of tones in the shadows. The images looked like this:

DSC_9164 DSC_9165 DSC_9166

  • I exported the three images to the HDR tool in Photoshop using the ‘Merge to HDR Pro in Photoshop’ command and saved the resulting combined image as a 32-bit image. Note that Lightroom cannot read 32-bit PSD files so it is best to configure Lightroom to export as a TIFF to Photoshop.
  • With the new 32-bit file back in Lightroom I could begin editing. At first glance, the image doesn’t seem to have any more information in it than before the HDR conversion but that is because all 32 bits of data can’t be displayed at once.  Instead, it is best to think of the file as a RAW with an enormous amount of information in the highlights and shadows. Pulling the Shadows slider all the way to +100 and the Highlights slider to -100 and a reduction of the Exposure slider to taste gives the following image. This is a good demonstration of the amount of data present, but not quite a final image. 32-bit Quick AdjustWith some further tweaking in Lightroom (exposure controls, curves, saturation/vibrance, sharpening) I got reached this point:

DSC_9164-ColourAt this point I wasn’t too happy with the banding in the sky… something I’ll have to figure out for future images. In the end I opted to convert to black and white for a darker feel.

DSC_9164-Black and WhiteAnd there it is, a simple HDR technique that doesn’t use any of the tone mapping features of common methods. I prefer this approach to those with tone mapping primarily because I have full control over the edit.

Creating a Wedding Party Composite with Flash

I’ve had a request to explain in more detail how I achieved the wedding party composite from yesterday’s post. I borrowed the idea from Ryan Brenizer, who uses this technique very effectively to achieve dramatic (but even) lighting over a group of people. This would be extremely difficult with a single or pair of flashes in a single image, especially on the fly and in the wild.

Here’s how it’s done.

First I set the camera (D300s with AF-S 17-55mm f/2.8 @ 17mm) on a tripod to keep the framing the same between each shot. I used manual mode to ensure consistent exposure. Settings of ISO 200, f/8, 1/250s gave this look:

DSC_6107

The ambient light is at least a stop underexposed, which is right where I wanted it. The next step was to set up the flash. I used a Nikon SB-900 set to wireless TTL control (the Nikon CLS system is powerful and complicated… something I’m sure I’ll delve into explaining in another post) and triggered with the on-board flash. To diffuse and soften the light, I added my favourite light mod, the Lumiquest Softbox LTz. This softbox mounts to the flash with velcro and folds up to the size of a 17″ laptop, which most camera bags nowadays have a slot for. Portt, who was assisting me that day, held the flash up close to each pair of people and I took a shot for each position.

DSC_6111DSC_6112


DSC_6113DSC_6114DSC_6115

In Lightroom, I batch processed the five images for exposure, lens correction, sharpening and then opened them in Photoshop as layers in a single file. Using the first image as a base layer, I painted in the relevant bits from the successive layers and finished things off with some global and local curves and dodging/burning. Here’s the final image:

DSC_6111-Edit

To get this look in a single image would have required some pretty tricky lighting, both to light each person evenly and to control the spill on the background. In all, the composite took just a few minutes to shoot and less than half an hour in Photoshop. An added bonus to shooting each pair separately is that I can focus on just two faces at a time (i.e. no blinkers).

“Vintage Faded” Look

Lately I’ve been playing with a “vintage faded” editing technique, where I push the shadows and pull the highlights so they clip early. Combined  with a bit of cross-processing using the new RGB curves in Lightroom 4, I’m getting close to a look I’m happy with.

Mitzy in Parc Lafontaine

I’m finding that the RBG curve tool is extremely sensitive… moving a point on the curve has a strong impact on the image. When focusing on a single image there’s no problem. When trying to batch convert or save a generic preset I find that a curve that looks great on one image looks terrible on another.  Maybe I should create a series of curve presets with increasing strength.

Sludge Lagoon

Here are a few more shots. Thoughts? Is this look successful?

Faded Leaves

Mitzy's Contessamat

Ark Analogue